
You’ll be hard pressed to go a day without encountering some application of electromagnetism in your life. Good luck turning on your lights, driving to school, or even just using your eyes. You’ll also be hard pressed to do well in your HSC Physics course without a strong understanding of Module 6 - Electromagnetism. The concepts in this module are crucial foundations which lead onto the key discoveries in Module 7 - The Nature of Light, and Module 8 - From the Universe to the Atom. Yet despite this importance, Module 6 is so often overlooked or underestimated, perhaps because it leans quite heavily on concepts from Year 11 Physics. My goal in this article is to help demystify Electromagnetism, and reveal the key themes and structures which will help you go on to ace this module in your assignments, tests, and the HSC exam.
My name is Cory and I graduated in 2018 with a 99.95 ATAR and two state ranks in Chemistry and Economics. I’ve gone on to complete a Bachelor of Science in physics at the University of Sydney, and am currently pursuing my Honours in quantum physics for 2022. I hope that my experiences can give some insight to help you do your best and ultimately achieve what you set out to achieve.
The Year 12 Syllabus
Before we get into electromagnetism, a quick side note. If you weren’t already aware, there’s this little document called the HSC Physics Syllabus. This treasure trove of information outlines exactly what you are expected to cover in each of the modules, and I highly recommend taking a look before setting out on your journey.
Each module is broken down into key subsections; in Module 6 there are four:
- Charged Particles, Conductors and Electric and Magnetic Fields
- The Motor Effect
- Electromagnetic Induction
- Applications of the Motor Effect
Within each section, there’s an Inquiry Question which guides the thinking, and individual dot points which highlight what it is you’ll be learning. Treat these dot points like a checklist to ensure you don’t miss anything! I would always try and structure my notes around these dot points to ensure I kept on track, and I would be using these dot points as revision nodes while preparing for any exam or assignment. I cannot emphasise this enough: these syllabus dot points are your best friend.
Key Concepts and Skills
It is crucial that you have a thorough understanding of each of those four subsections of the syllabus mentioned above. In this section, I’ll go through and try and demystify the key points from each. This is NOT a thorough explanation of all the ideas in each dot point! You will still need to do (quite) a bit of study by yourself to finish this module, but hopefully this section can give you a foundation to build upon.
Looking for a guide to answering short answers and long-response questions? Read Project Academy’s study guide for it!
Charged Particles, Conductors and Electric and Magnetic Fields
Inquiry question: What happens to stationary and moving charged particles when they interact with an electric or magnetic field?
As the inquiry question tells us, this subsection is all about how charges interact with electric and magnetic fields. In particular, we want to be able to model and predict the behaviour of a particle, finding its acceleration, velocity, displacement, etc. Sound familiar? That’s because this module really is very similar to Module 5 - Advanced Mechanics! Just as we analysed the motion of projectiles in gravitational fields, we can use a lot of the same techniques and processes to analyse the motion of charges in electromagnetic fields.
Let’s consider two key cases:
1. Charges in electric fields
Let’s imagine an electron in an electric field. This electron will experience a force in the opposite direction of the field (because it is negatively charged!), with magnitude F = qE. Let’s assume a few things:
- The field is uniform, so that it is constant in direction and magnitude everywhere
- There are no other forces acting on the electron
Perhaps these assumptions are sounding familiar also - and they should! These are the exact same assumptions we made when discussing projectile motion in Module 5. Under these assumptions, we get a very specific type of motion for our electron: in one direction (along the field lines) we get acceleration following:
y = uyt + 0.5(at)2
a = qE/m
in the other direction we have no acceleration and x = ux t. Note that we have assumed here that y is in the direction of the electric field, but we could just have easily made it x (or z, or whatever we want).
Just as in projectile motion, the charged particle will follow a perfect parabolic shape, and all your favourite SUVAT equations will apply! If you know how to do projectile motion, then you know how to figure out charges in electric fields!
You might be thinking - does assumption 2 actually hold? Surely we need to take into account other things, such as gravity?? Let’s look into this a bit more deeply. We know the acceleration due to gravity is g = 9.80 m.s2 regardless of the particle’s mass. On the other hand, the acceleration due to the electric field is qE/m. Using the charge and mass of an electron (check your formula sheet!) and a field of 1 N/C, we get 1.8x10¹¹! Last time I checked, this is much larger than 9.80. So, it turns out the electric field is much, much stronger than gravity when dealing with such light particles - and so assumption 2 is pretty much valid.
2. Charges in magnetic fields
What about an electron in a magnetic field? This is where it gets really interesting. The force on the electron is F = qvB, but the magnitude is such that this acts perpendicular to both the velocity and the magnetic field lines. What other kinds of forces do we know that always act perpendicular to velocity? Centripetal forces! When we were considering circular motion in Module 5, we saw that we needed a constant radial force, perpendicular to the velocity, to cause an object to move in a circle. This is exactly what we have here.
Therefore, a charged particle, with an initial velocity perpendicular to a magnetic field, will undergo uniform circular motion in that field!
The Motor Effect
Inquiry question: Under what circumstances is a force produced on a current-carrying conductor in a magnetic field?
A large part of this module is getting us to understand how a DC motor and an AC motor operate. Before we can get to that, however, this subsection first takes us through how currents behave inside magnetic fields - which will be a crucial component of our motor.
The key idea is this: we know that a charged particle experiences a force when it moves with some velocity perpendicular to a magnetic field. Since currents are just movements of charges (positive charges, if we’re talking conventional current!), then it stands that we should also get a force. This force is known as the motor effect, and it causes current-carrying conductors to undergo accelerations in magnetic fields. Just as with a single charge, this force only arises when the current and field are not parallel.
To do well in this subsection, you need to understand how to calculate the forces on currents, especially taking into account parallel and perpendicular components, and also how to use your appropriate right hand rules to determine the direction of the force.
Electromagnetic Induction
Inquiry question: How are electric and magnetic fields related?
No joke, this subsection is probably one of the most profound and intriguing aspects of the HSC Physics syllabus (at least to me!). Here we learn that electric and magnetic fields are fundamentally related - forming a combined “electromagnetism”. The core result of this is culminated through “Faraday’s Law” and Lenz’s Law - the tools that describe how changing magnetic fields can be used to create electromotive forces (emfs), electric fields, and currents.
There are so many consequences of this result. We get a brief taste of these implications by studying transformers: devices used to change the voltage of an electrical circuit, which are vital for efficient power transmission. More examples are explored in the final subsection.
To do well in this subsection, you need to be able to apply Faraday’s Law and Lenz’s Law to a variety of situations. Let’s consider Lenz’s Law in a bit more detail:
The law states: The current created by an induced emf is in the direction such that its magnetic field opposes the change in external magnetic field that created it.
To answer questions using this law, I like to follow three steps:
- Determine the change in external magnetic field. Is the field strength increasing or decreasing? Is it pointing into or out of the page?
- Determine the opposing change. If the field strength is decreasing, then the opposing change would be to increase it. If the field strength is increasing, then we want to oppose it by applying a field in the reverse direction.
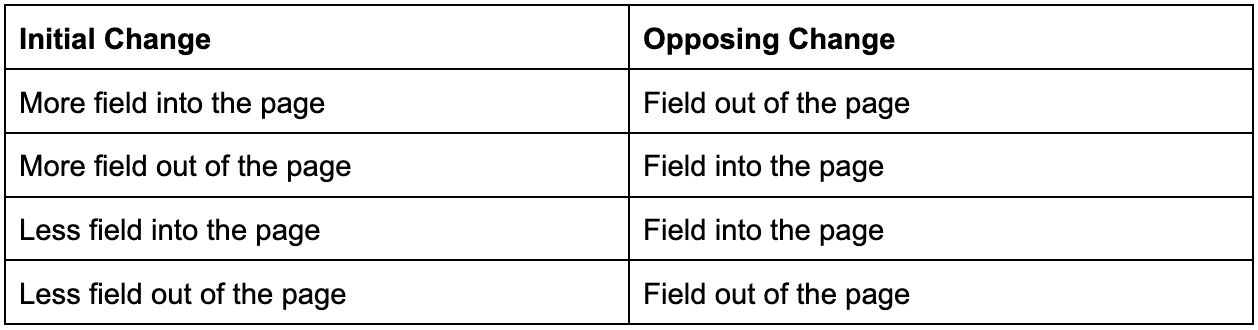
- Determine the current direction that would create that opposing change. Typically we are dealing with solenoids, and so you would use your right hand rule to determine the appropriate current direction.
Like Project Academy’s style? Come enrol in our Physics course!
Application of the Motor Effect
Inquiry question: How has knowledge about the Motor Effect been applied to technological advances?
We conclude this module by considering more applications of the Motor Effect, and of electromagnetic induction. As the name suggests, a key application is the electric motor.
This module includes a detailed understanding of simple DC motors, AC induction motors, and DC and AC generators. Note that the old syllabus also emphasised simple AC motors, but that is no longer the case.
The key operating mechanism of a simple DC motor can be summarised by the following process:
- Current through the coils of the motor creates a force due to the Motor Effect
- This force applies a torque, which causes rotational acceleration of the rotor
- As the rotor rotates, the angle between the force and the level arm changes, causing torque to decrease to a minimum when the coil is vertical
- To ensure that torque is maintained in the same direction, allowing a continuous rotation of the rotor, a split-ring commutator reverses the direction of current every half turn
- As the motor spins through the magnetic field, the coil experiences a change in flux. This causes a “back emf” to be induced via electromagnetic induction
- By Lenz’s Law, this back emf opposes the initial supply emf, so it reduced the current in the coils and therefore reduces the force and torque
- As the motor speeds up, this back emf increases until a point where it equals the supply. Then, there is no net current, force, or torque, and the motor has reached an equilibrium at its maximum speed
To do well in this module, you should be able to expand upon each of those dot points, linking the physical concepts to any relevant laws and supporting your answer with appropriate diagrams and calculations.
Sample Questions for Module 6 Electromagnetism
So, you think you understand electromagnetism? Let’s consider some example questions.
Explain the functioning of a DC motor with reference to each component. (6 marks)
In this question, we want to ensure that we reference all the key components of our DC motor. Although this is 6 marks, it is not necessarily deserving of a long-response-type answer. A typical marking scheme for this may award points based on the number of correctly described components.
Sample answer:
- FUNCTION: Transforms electrical potential energy into rotational kinetic energy through the Motor Effect (a current-carrying conductor in a magnetic field experiences a force perpendicular to the field and the current)
- STATOR: Non-rotating, consists of magnets fixed to a casting that provides the magnetic field; can be electromagnets or permanent magnets
- ARMATURE: A frame on which coils are wound (that carry the DC); Usually made from a ferromagnetic material such as a soft-iron core that enhances the magnetic flux threading and therefore the force/torque
- ROTOR: Consists of the armature and the coil
- SPLIT-RING COMMUTATOR: Reverses the direction of current during rotation to maintain constant direction of torque. Consists of spring-loaded brushes (graphite, act as a dry lubricant) against a two-piece conducting metal ring, each side connected to the coil; Changes direction every half-turn by alternating contact with the brushes (connected to the DC source)
- RADIAL MAGNETS: Can be used as part of the stator that maintain magnetic field lines always perpendicular to the plane of the coil, therefore maximising torque (torque = nβIAcos(θ))
- LAMINATIONS: The soft-iron core can be laminated with insulative layers to reduce the size of induced eddy currents, therefore minimising unwanted heating, and reduced efficiency through energy transformations
How is the direction of torque maximised as a DC motor’s coil rotates 360˚? (3 marks)
For this question, we really want to lean into the idea of CAUSE/LINK/EFFECT to justify the “how” verb in the question. The key understanding to get across is that the angle between the coil and the magnetic field affects the torque magnitude. A typical marking scheme would be (1) Identifies relationship between angle and torque; (2) Explain the conditions when torque is maximised; (3) Relates these conditions to the use of radial magnetic fields.
Sample answer:
- CAUSE: Torque = nβIAcos(θ), where theta is the angle between the plane of the coil and the magnetic field
- LINK: Torque is maximised when theta is 90 degrees (perpendicular)
- LINK: A radial magnetic field ensures that the plane is always perpendicular to the plane of the coil (except for at the vertical)
- EFFECT: Radial magnets maximise the torque as it rotates
Explain how induction is used in induction cooktops and electric braking. (4 marks)
Again, this question requires a CAUSE/LINK/EFFECT relationship to be developed for both applications. Given that it is worth 4 marks, we would take there to be 2 marks per application, with one mark awarded for showing understanding of its operation and another for explicitly describing the process of electromagnetic induction.
Sample answer:
INDUCTION COOKTOPS:
- CAUSE: Eddy currents induced in a metal surface increase the temperature of the metal due to resistive heating, where collision of electrons with the metal lattice transfer some of their energy to heat energy
- LINK: In induction cooktops, a high voltage, high frequency AC input is supplied to an “induction coil” induces eddy currents in the ferrous material of a saucepan on top of a ceramic top plate by Faraday’s Law
- EFFECT: These currents cause the saucepan to heat up, with minimal loss of thermal energy, unlike in conventional gas/electric stoves that heat only via conduction (efficiency of 80% vs 43% for gas)
ELECTRIC BRAKING:
- CAUSE: A spinning metal disk attached to a rotating wheel passess through a magnetic field (controlled by electromagnets)
- LINK: By Faraday’s Law, this changing magnetic flux through the disk induces an emf, which by Lenz’s Law induces a current to oppose this change in flux
- EFFECT: The magnetic field created by these eddy currents opposes that of the electromagnets, therefore providing a resistive force as it repels when approaching an attracts when moving away, which acts to brake the wheel/vehicle (smoother than conventional braking with pads, and no friction reduces wear/maintenance)
Explain the production of back emf in a DC motor and relate it to the increased work required to operate a DC generator when a load is connected to the circuit. (5 marks)
There is quite a bit to unpack with this question, and we need to ensure that we address each point to get the marks. I would recommend structuring this kind of question by starting off by explaining how a back emf arises, then explaining DC generators, and finally linking the two.
Back Emf:
CAUSE: When a DC motor’s rotor rotates with a magnetic field due to the motor effect, the coil experiences a changing flux.
LINK: By Faraday’s Law, a “back emf” is induced within the coil by ϵ = -(nΔϕ) / (Δt) , opposing the emf of the power supply (net emf = supply emf - back emf)
EFFECT: The rotor accelerates rotationally until back emf equals the input voltage, and therefore net voltage across the coil is zero (and no torque by 𝜏 = nβIAcosθ).
Link to DC Generators:
CAUSE: In a DC generator, an emf is similarly established in the coils due to Faraday’s Law and the change of magnetic flux in the rotor
LINK: If a circuit and load is connected to the coil, then a current is induced in the wire
LINK: By the motor effect, a current in a magnetic field experiences a force perpendicular to direction of flow
EFFECT: This force opposes the rotation of the rotor, therefore requiring increased torque (and work) to maintain the same rotation of the generator
Conclusion
Congratulations on reading all of this! I hope that some of these points have been useful in helping you understand some of the key points of Module 6 - Electromagnetism, or at least in identifying areas where you may need some work. I truly believe that this is a really exciting, interesting and ultimately important module of study - I am definitely still using a lot of these ideas today in my university work!
Looking for a guide to answering short answers and long-response questions? Read Project Academy’s study guide for it!
Bonus FAQs
- Is HSC Physics hard?
Is an apple big? As cliche as it is, the answer really is relative! I know some students quickly grasp new physics concepts while others take a longer time to become accustomed to the way of thinking required to do HSC Physics. What I can say though is that it definitely is accessible - the content is not too mathy, nor too abstract, nor too hands-on, to make it unconquerable for any student.
- Is Year 11 content in the HSC Physics?
Yes! Although they won’t be testing you word-for-word what you had on your year 11 final exams, there is a strong overlap. Take a look at the formula sheet - quite a few of the formulas you learnt in year 11 are there. Moreover, the whole of Dynamics and Kinematics (Modules 1 and 2) were there to lay a foundation that is continued on in Module 5 - Advanced Mechanics. Module 4 - Electricity and Magnetism also continues on quite heavily within Module 5 - Electromagnetism. So, if you are looking to do well in HSC, it won’t hurt to brush up on your year 11 notes too :).
- Where can I find Year 12 Physics notes?
In your notebook hopefully! I believe that the best way to make notes is by actually making them yourself, not copying off your friend/teacher/enemy/cat. HOWEVER, it sometimes helps to have a foundation to base yours off, in which case there are fantastic resources such as your textbook or online - like at Project Academy’s website.
- What are the best Year 12 Physics textbooks?
Any of them! In terms of content, I have yet to find one that was significantly worse than any other. A few of them may have better questions, more worked examples, nicer illustrations, but I think whatever you have on hand will do the job well. Just make sure that it is from the new syllabus (2017 and later).
- Is Year 12 Physics similar to Year 11 Physics?
See question 2 for content. In terms of how to approach it, I think that Year 12 does place a greater emphasis on applications of understanding. Whereas a large part of Year 11 is getting you to be comfortable with the various concepts, mathematics, and language, the HSC will try and push you to apply what you learnt in entirely new settings. Memorising a bunch of answers from your notes won’t get you very far in the final exams. A good way to prepare then is to expose yourself to as many different kinds of questions and scenarios as possible, and think deeply about how each are different and how they all relate to the core HSC physics concepts.